Final PSA

For my final PSA video, I decided to do awareness about recycling. To help kickstart this project, I created a mind map. In this mind map, I wrote down everything that came to mind for me regarding recycling and its effects. This map allowed me to extend my ideas so I could visualize how my video could turn out.
Information Research: https://www.recycleacrossamerica.org/recycling-facts

After mind mapping, I created a storyboard to further visualize my video presentation. This storyboard allowed the research I collected to be put onto the screen and visualized. With this storyboarding process, I was able to see what images I wanted to place with what words and how I wanted to animate the slides. More ideas popped into my head as I continued the storyboard. Above are some of the storyboard slides I created. I ended up having 50 storyboard slides but didn’t use all of the information in my PSA video.

This is a screenshot of my final PSA. Overall, I thought the process was very time-consuming. It took me many hours to put this together in the way that I envisioned. To make this video I brought in various copyright-free images from the Internet and made some drawings using Illustrator. Then in After Effects, I added the pictures together including the text and transitions. I attempted to play around a lot with the transitions and animations because I wanted the project to come to life. I learned a lot about After Effects in this process and definitely tried to challenge myself in different ways. I didn’t end up using all of the information from my storyboard and research because with the animations and transitions my video was already long enough and to the point. After going through each information section and making sure it was perfect, I searched for music to add to the background. Although it is sometimes taken for granted, music usually makes a piece have more of an effect when done right. I wanted to make sure I had the right sound before completing my video, so I searched through many copyright-free songs. I am pleased with the outcome of the video and thought it had a very emotional impact. I myself was impacted further by these facts after watching it and wanted to take action.
Stop Motion

When I was first assigned to do a stop motion project, I thought of the movie Matilda. I remembered how cool it was to watch the scene where she made herself pancakes in the morning, without touching anything! I wanted to recreate a similar scene in my stop motion video with breakfast being made on its own. Above is a picture of my storyboard describing what I envisioned the video would be like.

This is one of my stop motion videos. I got a waffle and recorded the process, through taking pictures, of it going in the toaster and being made. I thought the final result was cute and fun but knew I could do more. After watching the other stop motion videos in class, I realized the simpler, shorter ones were more interesting to me. They were something I could watch over and over again and I wanted to recreate that feeling in my own work.

This is my final stop motion video. I went along with the ideas I saw in class and decided to make a simple video. This video was inspired by origami and how intricate it looks once it is made. However, I realized the process of origami making and unfolding itself was a unique perspective to me. I folded the paper and took all the pictures to make this video. I enjoyed how it was simple and came full circle in the end with the paper unfolding. I edited the frames a little in terms of brightness and contrast to make the paper stand out against the background. Overall, I am pleased with the turnout and am glad I was able to make something I could watch over and over again.
Stop Motion Research: https://www.pinterest.com/sluker3120/stop-motion/
Eating Cinemagraph
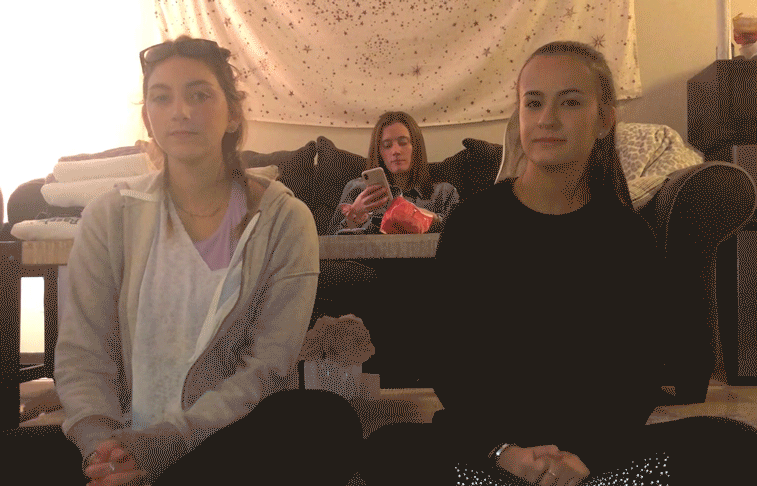
When I first thought of making a cinemagraph, I wanted to have a loop of someone eating, making it look like they were binging forever. My first attempt was a video of one of my friends eating popcorn on the couch with two other friends sitting in the foreground. I liked how I was able to get my friend eating popcorn in the background looped correctly, but in the end, I thought the focus wasn’t right. The left side of the cinemagraph was too bright and the action the viewer was focusing on was too far away. I decided to remake this idea with better positioning, thinking about my composition further.
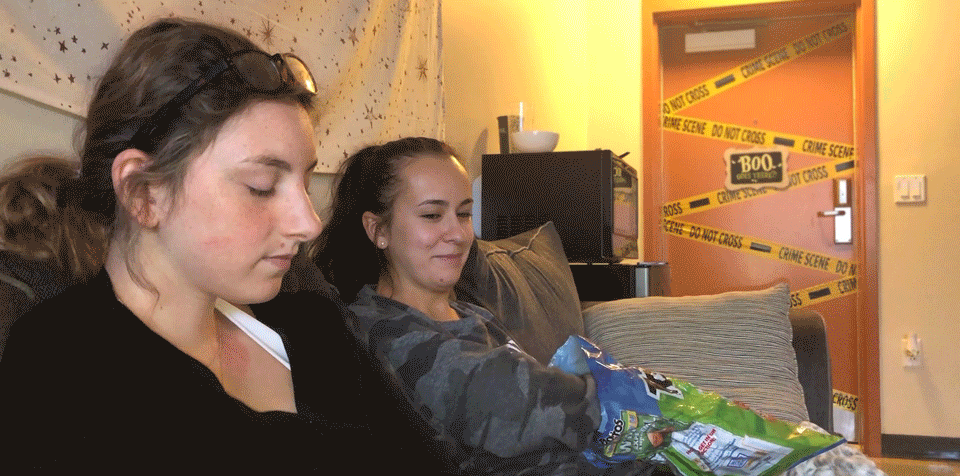
My final eating cinemagraph involved my friend on the couch eating a bag of chips. I thought about the composition of this video more carefully than my first attempt and paid attention to the details of the action. In the process of making this, I cropped the video to make the composition exactly how I wanted it. I also made the background a little darker to be less of a distraction from the action. I used the blur tool to blur the door area in the frame because there was a lot going on in that corner. I am pleased with the final outcome and like it better than my previous attempt. Overall, cinemagraphs aren’t my favorite thing to make, but in the end, they always look very interesting to me
Television Cinemagraph

My other cinemagraph, which was much easier to make, involved a television. I had this idea because rather than pausing just the tv, the cinemagraph allowed life to be paused around the moving screen. To create this idea, I first took a video of two friends chatting in front of the television. This natural action allowed me to capture them frozen in an unusual state rather than just having them pose. Their positions make it look as if they should move, but only the television does. I also thought it was interesting to have the television brightness increased so the viewer just sees bright flashes coming from the screen. This allows them to realize the screen is the only “alive” element in this video. I also did some cropping and editing to the video to get it exactly the way I wanted it to be. I am happy with the final outcome and think it is an interesting cinemagraph to view.
Cinemagraph Research: https://www.pinterest.com/sluker3120/cinemagraphs/
Rainbow Gif

This was my first sketch for the block gif idea. I had originally come up with the idea of a screen full of blocks and them falling off the screen and moving in different ways. As I began to create it, I thought of what colors I could use and other ways in which I could manipulate it. After I used all the colors of the rainbow and their different tints, I realized I could make these blocks form into an actual rainbow.

Above is my first attempt at the rainbow gif. I wasn’t given much criticism on it from class but improved on it still. I was told that it should be more centered and not coming off the page. I also noticed that the clouds didn’t line up with the blocks exactly the way I wanted it to. Through this process, I realized how much detail was involved in gifs.

This is my final version of the rainbow gif. I altered the suggestions and am very happy with the outcome. Unlike the light switch gif, this gif was easier to make using shapes and colors. Sometimes it is the simplest things that bring the most joy.
Light switch Gif

These were my first sketches for my gif idea. I came up with this idea because it was something that could loop with the light turning on and going back off again. I planned to start with a blue, dark room with the lightswitch being sad. After that, I would grow the room lighter as the light turned on and it became happier. Animating the light switch with a face was my idea of making it more personable and fun.

As I was going through the process of making this, I found it tedious to remember each detail on each layer. As I refined my work further, I paid attention to as many details as I could. The above photo shows some of the suggestions I was given after the class looked it over. I took these to heart as I refined my work further.


These were my first two attempts at the gif.

This is my final version of the light switch gif. I am very pleased with the outcome and know it is something I can watch over and over again. This process of making gifs was very fun and I’m glad I was able to use my creativity to create something in motion.
Gif Research: https://www.pinterest.com/sluker3120/gifs/
Readings
Motion Graphic Design
CHAPTER 1:
Persistence of vision, the eye’s ability to retain an image for a fraction of a second after it disappears, was an important occurrence during this timeframe. Pioneers such as Eadweard Muybridge and the Lumiere Brothers were developing the first motion pictures ever. Artists began rejecting classical representation and would go for geometric and abstract looking things instead. The use of special effects also started to spread. The first-ever animation films were released involving machines like the pinscreen and multiple layerings. Computer animation became more accepted as people began using it for films.
CHAPTER 2:
Movie title sequences with opening credits began having the most experimentation with animation. Unlike quick openings in silent films, these openings were now movies of their own bringing you into the world of the movie by just using drawing and collaging techniques. Saul Bass and Pablo Ferro were very famous for their movie openings. Title sequences became even more abstract over time with new styles pushing the boundaries. Friz Freleng created the opening cartoon for The Pink Panther, which was seen as iconic in pop culture. Effects ranged from drawings to cutouts, to 3D effects and more. Kyle Cooper took these trends and combined the conventional with the digital creating the sequence for Se7en which is a historical landmark.
Animated Storytelling
CHAPTER 1:
Pre-Production is the doorway to a well-planned animated piece. Pre-Production involves writing a creative brief and identifying your big idea. Creating a storyline will help to extend this idea into a narrative. It is important to develop an elevator pitch and a tagline. Experimenting with different design directions is a good step as it helps you to explore all you can do with your project and determine how you want your project to look and feel. You also shouldn’t have to feel afraid to make changes to your story if it fits with your new design outline. The final step before producing something is to build and organize your assets, so you have all the tools necessary to start your project.
CHAPTER 2:
Storytelling is a medium with no limits that you can go anywhere with. One can choose to follow a three-act structure or a nonlinear structure. In a three-act structure, you would first create the beats, which are the action steps that move your storyline forwards. These beats will then get placed into three acts: Act 1, problem, Act 2, attempt to resolve it, Act 3, resolution. All of these three acts combined will create the story’s arc. Following a nonlinear structure is slightly different. First, you would identify your inspiration and then create the beats. Next, you can build your own structure to follow with as many acts as you want. Some known structures that people like following are Book Ending, The Countdown, The Puzzle, and The Beaded Necklace.
CHAPTER 3:
Storyboarding is building your visual script. There are many different tips to think of while drawing up a storyboard. Varying your shot sizes is important to enhance the narrative and drama. Framing and the Rule of Thirds keep the shots interesting when they are off-center. Staging elements for conceptual hierarchy is important to the plotline. Spacial continuity keeps frames consistent with the world that was created in the frame. Temporal Continuity keeps frames consistent and in order with the story. Directional Continuity keeps things moving in a consistent direction frame to frame. Timing is important in making sure your storyboard isn’t longer or shorter than it needs to be. Animatics steps into animation, putting storyboards in a digital timeline.
CHAPTER 4:
Having color sense allows your story to be enhanced with the right palette. It is important to pay attention to the hue, saturation, and value of the colors in the frame. Making color scripts to emphasize key moments will help in the process. Color scripts involve choosing certain colors to add to each act and implementing those colors into the storyboard drawings. Some tips to think of while choosing colors are limiting your palette and supporting your subject. Doing this will only add to the piece and not take away from it with unnecessary distractions. Selecting one thematic and one accent color will help to unify the frames together. It is important to use saturation mindfully and to use surprise color for punctuation. A new surprise color will tell the viewer this is something important to look at. Lastly, you should design for movement and make your own rules to find your right color combination.
CHAPTER 5:
It is crucial to experiment with animation, known as the “weird science”. It is up to you to push your boundaries and create different animation combinations. Don’t be afraid of making bad art while experimenting, every success comes with failure. Be sure to work on the edge of your skillset so you can be ready to expand it at any moment. You should also always make the work you want to be hired to do. This way people will see your unique style and you can continue doing what you like to do. Working on these personal projects will allow your style to shine through. Making an experience list will allow you to experiment with different styles on your different storyboards to see what works with each frame. Experimenting with transitions and movement is key to adding life to your frames and keeping the viewers interested.
CHAPTER 6:
Getting your audio and story in sync will allow for the story to come to life with a rhythm. Let sound lead your story, transitioning you through each frame. It is important to organize what will be the diegetic and non-diegetic sound in the scene. Diegetic sound is the sound coming from sources visible on the screen. The non-diegetic sound is not visible by the screen or implied by the screen and adds a rather unnatural, surreal element. Sound effects can also enhance the elements in your frame to add life to the story. However, it is not necessary to add individual sound effects each time, a good music soundtrack as a sound effect can add just as much to a piece sometimes. Music is an important decision that can add emotion to a piece and determine the journey the audience goes through as they watch. Dialogue can add to a piece sometimes, but often times it is best to avoid dialogue. You haven’t successfully made the piece if your viewer doesn’t understand the theme just by the visuals. Aiming to please the audience solely visually and audibly could have the greatest impact on them. Regarding narration and voiceover, keep it simple. If this aspect is absolutely needed, keep it simple so anyone can understand it. Timing is everything and can make or break a piece.
CHAPTER 7:
Designing the world for your piece is an important step. Viewers should be transported into this world the moment they begin watching your piece. Designing consistent rules for your world is important as people need to understand the logic that works in this environment so they aren’t confused. Defining a time and place is an important part of these rules so people know where they are. Considering physical and social laws go into this process as environmental aspects need to have boundaries. Defining visual laws determines the tone and feel of your world. In the world of motion graphics, is important to explore all the values of a brand before creating the world so you know exactly how to capture the audience’s attention. This also goes along with establishing visual rules for the brand to be recognized by.
CHAPTER 8:
The technique you use is an important aspect of your piece. Marrying your style and story will bring about success. Consider the format of your piece, including whether its meant to be viewed on a large or small screen. Translating your story to this format with the right technique is important. Consider many techniques and visual styles before just diving into one, there are many options. Adapt your technique into your story so you can visualize what the finished product can look like. If you don’t necessarily like your technique across all frames, use a workaround that incorporates parts of other techniques, make it your own. Workarounds can include importing still images, shooting live-action footage, and outsourcing by hiring people to add other techniques to your piece.
CHAPTER 9:
The animation in the story is one of the final steps of storyboarding. Begin animating frame by frame, while also keeping the big picture in mind. Start off with easy shots first so you can gain confidence in your work as you go. Break up the tougher shots into smaller pieces so you can tackle it easier. Animation is a lengthy process so make sure to plan your time so you can complete each desired animation. Back up your digital files at the same time as you work so, you don’t lose anything. Pose your shots before animating and always anticipate and follow through with the movement. Make sure to compose directional movement for the whole film and compose the shots so the subject isn’t always in the center. Mixing up the shot length and timing will give the film a needed variety. Add blur and vignettes to give the piece and touched up look. Be flexible with your soundtrack and make sure to listen to the sound while animating so it goes together. Mute your soundtrack and check the movement to make sure it looks good visually as well.
CHAPTER 10:
Show off your finished piece, sharing and networking it. Package your final product including all the needed credits. Create your network, utilizing online platforms to publish your story on. Do not forget about human networking as well. Going to events and meeting people to share your stories with can have a huge impact. Continue sharing the final product until your next story comes out!
